Marlin’s Model 1891 lever-action repeater was manufactured from 1891 through about 1897, with nearly 19,000 rifles manufactured in all. This handy, small-framed model was offered in both .22 and the then-popular .32 rimfire calibers. The 1891 was a unique firearm in that it was the only Marlin rimfire lever-action that used a loading gate in the side of the receiver. A few of the last 1891s made did use a tube-type loading system with inner and outer magazine tubes, like so many subsequent .22 rimfire rifles of various makes made to this day. An attractive rifle, it had the look of a scaled-down version of the larger-caliber lever guns of the day.

Author photos
300
The design of the 1891 action was ingeniously simple and this basic principal was carried over into the Model 1892, which was actually introduced in 1895. Like the last few 1891s, the Model 1892 used a two-piece (inner/outer) magazine tube that was loaded through the front end. Marlin made the Model 1892 until about 1916, with a total of something over 45,000 rifles manufactured. This popular model went through still more improvements and was later reintroduced as the Model 1897, a truly good looking, neat little take-down .22 repeater. This gun would later evolve into the well-respected rifle we know today as the Marlin Model 39.
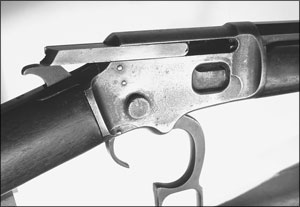
The takedown instructions given here will work with the Model 1891 as well as with the later Model 1892. The minor difference between the two rifles is the fact that the 1892 did not use a loading gate in the sideplate, as mentioned above. The remainder of the basic workings and internal parts remained essentially the same between these two models.
These little Marlin lever guns are just superb in every way. In fact, the Model 1891 and 92 were so perfectly simple and so well made that they rarely come in for repair, except, of course, for what many owners seem to think of as the “mandatory” cleaning—about once every 50 years. When trouble is experienced, it will usually be the result of looseness in the internal parts caused by wear at one or more of the gun’s three major action pivot points. These points are the lever, the carrier, and to a lesser degree, the hammer. Two of these pivot points are threaded into the receiver and one, the carrier, is a pressed-in pin. All of these are parts that, if necessary, can be easily duplicated in a lathe from high-quality drill rod. In this case, the gunsmith has the option of making the pivot area oversized to compensate for wear in the moving parts.
300
Disassembly Instructions
1. First, let’s make sure the rifle is unloaded. Point the muzzle in a safe direction and hold it firmly around the forearm and barrel with your left hand. Now open the action by pulling down the finger lever (#27) all the way with your right hand, keeping your fingers away from the trigger (#65). At this point, check to be sure there is no cartridge in the barrel’s chamber. Also look through the bolt opening down into the action to make sure there isn’t a live cartridge in the carrier (#7) inside the action.
If there is a cartridge in the Marlin’s carrier, when you close the lever, you’ll be loading the rifle. To safely unload a rifle with a loaded magazine, keep the muzzle pointed in a safe direction with your fingers well away from the trigger as you operate the lever to the full-open and then the full-closed positions. Do this several times to expel any cartridges that may be in the magazine, repeating until no more cartridges are expelled from the action.
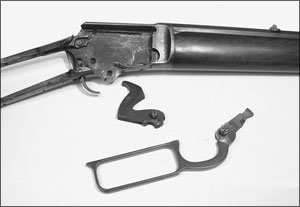
2. The next step calls for the removal of the sideplate, the lever, the breech bolt, the carrier, and the buttstock. Pull the finger lever closed and unscrew the sideplate screw (#62). You can now lift the sideplate off from the left side, rear end first.
Now thumb the hammer (#41) all the way back until it stays cocked, and open the finger lever until it is about halfway down. Lift the breech bolt (#3) all the way to the rear and out of the receiver. Once the bolt is out, you can lift out the ejector (#18) from its recess in the frame. Reach into the action and lift out the cartridge-carrier assembly (#7). Unscrew and remove the tang screw (#64) from the upper receiver tang, and pull the buttstock (#4) straight back and off to the rear.
300
3. Next we’ll remove the finger lever, the hammer, the trigger, and the safety. Start by unscrewing and removing the mainspring screw (#58) and lifting out the mainspring (#57). Next, unscrew the finger-lever spring screw (#29) and lift out the screw and the finger-lever spring (#28) from the bottom of the receiver. The finger lever (#27) can now be lifted straight up and off its pivot screw (#30). If necessary, the pivot screw can also be removed.
Unscrew and remove the hammer screw (#42) and lift the hammer out through the hammer opening in the top of the receiver. Next, unscrew and remove the trigger-spring screw (#68) and lift off the trigger/safety spring (#67.) Using a cup-tipped pin punch and hammer, drift out the trigger pin (#66). This frees the trigger (#65) and sear (#65a), allowing them to be pulled out through the bottom of the receiver. Take note their correct positions for later reassembly. Next, use a small pin punch and hammer to drive out the safety-lever pin (#65c). You can now lift the safety lever (#65b) out from the lower tang.
4. The final step involves the removal of the forearm, the magazine assembly, and the buttplate. Unscrew and remove the two forearm tenon screws (#37) and slide the forearm cap (#35) forward slightly—just far enough so it clears the forearm tenon (#36). Next, unscrew and remove the magazine-cap screw (#56) and pull the magazine tube (#43) down slightly. The magazine cap is now free and can be pulled out toward the front of the rifle.
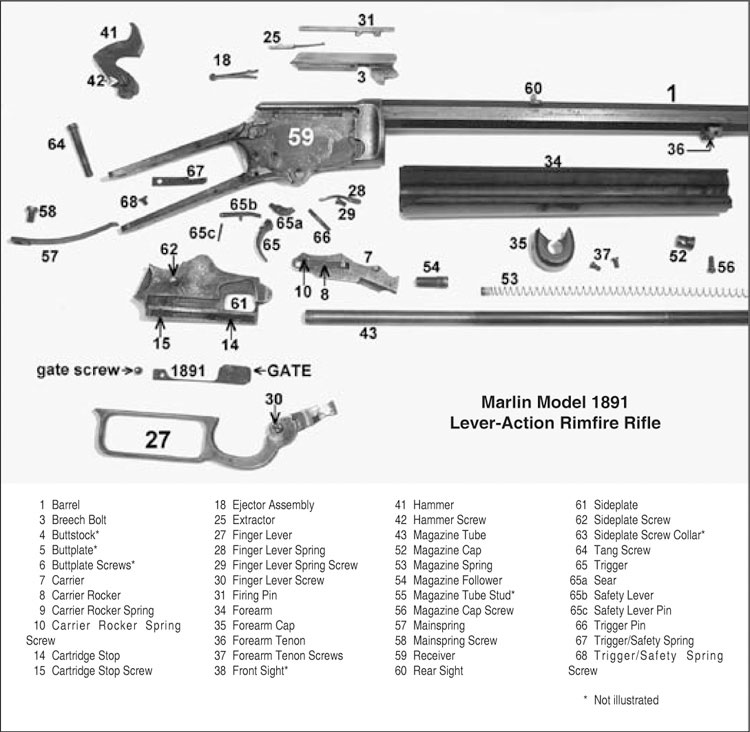
The magazine spring (#53) is also free to come out at this point. Note that the spring is under tension, and be careful to keep these parts captive as you remove them. The magazine tube is also now loose and can be pulled out of the forearm along with the forearm tip (#35). Once the magazine tube is out, tilt it forward to allow the magazine follower (#54) to fall out, taking careful note of its position for correct reassembly later.
At this point, the forearm itself can also be pulled down and off the barrel. The buttplate (#5) is removed from the stock simply by unscrewing the two buttplate screws (#6).
Further disassembly of the Marlin Model 1891 is not required for normal maintenance. As always, you’ll reverse the above procedures to reassemble the firearm.


