Many of us have seen the term “case hardened,” but know only that a tool so marked is hard. The case-hardened item may have a subdued coloring reminiscent of an “old-fashioned” tool. This notion is not far off the mark, as case hardening was often used in the past when the selection of steels was considerably more limited. In times past, it was more economical to harden only the surface of a relatively soft steel than to pay for a much more costly steel which could be hardened throughout. This fairly easy process was done in early times with fire and various powders—mainly bone. The bone supplied carbon and calcium which both hardened and colored the surface.
Courtesy
While case hardening is no longer used as much for economy, it makes sense in terms of obtaining a hard surface with a tough inner-structure. Conventional through-hardened steels must be used for parts which must undergo hammering or repeated impacts.
Case hardening is a selective process of hardening which raises the hardness of the surface of the part without hardening it all the way through. There are many steels which won’t harden and are also much less costly than tool steels or other high-carbon steels. One of the main ingredients of steel which makes the part capable of being hardened all the way through is carbon. Low-carbon steels tend to be softer and more malleable, while stronger and less malleable steels are higher in carbon content. Low-carbon steels have a lower propensity to align the charges on the molecules—a necessary property to harden steel, and consequently exhibit a low degree of hardening.
Case hardening causes a hard skin by combining the hot metal surface with another metal (or the salt of another) to form a layer consisting of an entirely different composition or alloy. This skin can vary in depth depending upon the different processes and the extent of the heat and time involved. Suffice it to say, the beauty of case-hardened metal isn’t just skin deep. An important benefit of case hardening is that the material toward the center of the piece is still in a more forgiving condition and is tough, not brittle. This often is used to an advantage, as the main part is slightly flexible and less apt to break, though it has a good, hard, and long-wearing surface.
Steel is hardened by heating the metal to a cherry red and quenching it by quickly dipping the red-hot piece in either water, saltwater (brine), or oil. The particular quenching liquid necessary depends on the type of steel. This information is supplied along with new steel or, if you know the steel type, you can look it up in a tempering book or Machinery’s Handbook. When I don’t know the type of steel I am dealing with, I always try hardening the piece in an oil-quench bath first. If this doesn’t harden the metal sufficiently, I use water. A water quench is much more violent than an oil quench and can make steels which should be quenched in oil very brittle and glass-like. It is often necessary to identify the approximate type of steel before deciding whether if would be best to harden the surface or harden it throughout.
American Gunsmith
The relative amount of carbon in a piece of steel can be recognized fairly reliably by anyone with a grinding wheel or disk. By observing the shape of the sparks thrown when grinding, you can determine whether the steel will take complete hardening or will require a form of case hardening. The best way for someone who isn’t conversant with steel alloys to identify the approximate type of steel is to get samples of known types of steel and compare the spark patterns thrown off when holding the pieces of steel against a grinding wheel. There will be quite a difference between the sparks of a tool steel and that of a low-carbon steel. One will throw mostly straight sparks which streak out in straight trajectories with slowly decaying paths, while others will send sparks out which resemble fireworks sparklers. Once seen, these star-burst patterns are easy to recognize. Spark patterns of steel which are like dying flares, and don’t have definite star-burst sparkles, will most likely be a mild steel and will not take regular, deep hardening. For these steels, a good case hardening can often increase the life of the part.
There are some types of tool steel which are air hardening, a quality which I find most frustrating when needing to anneal (soften) it. Heating the metal to a cherry red and cooling it slowly softens most metals, but I have never been able to cool an air-hardening steel slowly enough to consistently anneal it properly.
Courtesy
Annealing steel is the process of wiping the blackboard clean, so to speak, by returning the metal to its dead-soft stage. In most cases, this is done by heating the metal to red hot and cooling it slowly. The slow cooling allows the molecules to relax their alignment back to a random arrangement, resulting in a soft condition—the opposite of arresting the lined-up molecules to produce a hard condition. The usual ways to slow the cooling of the heated metal are to bury it in sand or cover it with asbestos. The slower the cooling, the more nearly dead soft the metal will be.
I often use mild steel found around my shop to make some minor parts, and depend upon a hardening of the surface to save the part from wearing excessively or rusting easily. Mild (low-cost) steel can be made fairly rust-free by a quick, cheap method, utilizing the used oil drained from your car. (This is also a good excuse not to be in a rush to take the drained oil to the recycling place until you’re good and ready.) The dirtier the oil, the better, as this is a rich source of carbon. I heat the part to a cherry red and quench it in the carbon-blessed oil, maybe repeating the process several times until I have a good blackening much like the carbonizing on camshafts and other parts of an engine. This surface is reasonably hard, but more importantly, holds up under the 96 percent average humidity found in the Southeast Gulf Coast of Texas. It simply won’t rust.
American Gunsmith
Another type of case hardening is usually referred to as “color case hardening” or “case coloring.” One way to do this is by using ground bone as the material to be combined with the surface metal. The process gives beautiful, swirled color variations to the hardened surface and is a science unto itself. It is, however, usually not as hard a surface as the dull-gray look of real hardening.
There is also a very good procedure which utilizes cyanide, with easily recognizable results. But its obvious dangers make it a well-controlled process to be done under factory conditions only. This method results in a maroon color on the surface, and is usually found on firearms where appearance is not the primary concern.
There are many types and brands of hardening powders on the market, but the one I use most and will describe here is Kasenit, a brand Brownells supplies and endorses. I have been using Kasenit for more than 12 years and have had no occasions where it has let me down. I’m sure that there are many good powders available. The procedures outlined here should be similar enough to enable you to understand slight differences in instructions.
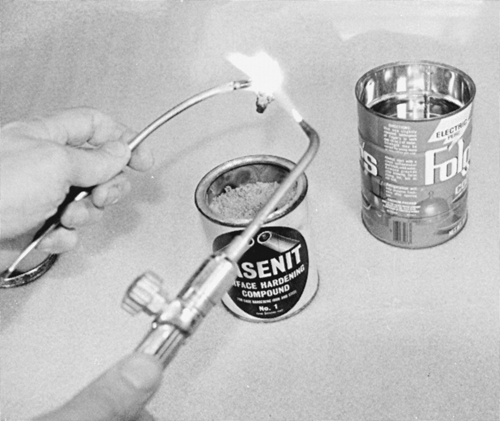
The Kasenit powder is a dull, gray, grainy powder which tends to lump up in the can over time. This doesn’t seem to hurt its functioning; I just break the lumps down as deep as I think I will need before I use the stuff. Unless the piece to be hardened is too big to fit into the 4-inch opening, I don’t even take the powder out of the can. Kasenit is nonpoisonous, nonflammable, and nonexplosive, according to the manufacturer. My experience confirms these statements.
Courtesy
Since the hardening is done in the metal and not on top of the surface, the part’s dimensions should not be affected. As with many metal-working techniques, there are a few places where this hardening isn’t advisable. Wear is decreased on hardened parts, and there is almost no chance of galling between parts which have been hardened. I use case hardening to increase the life of the cutting edges of drill bits and other cutters to prolong their edges without making them as brittle as hardening the entire drill bit would. Hammer, trigger, and sear pins do well when hardened; they wear less and have a lower coefficient of friction than a softer surface would give them.
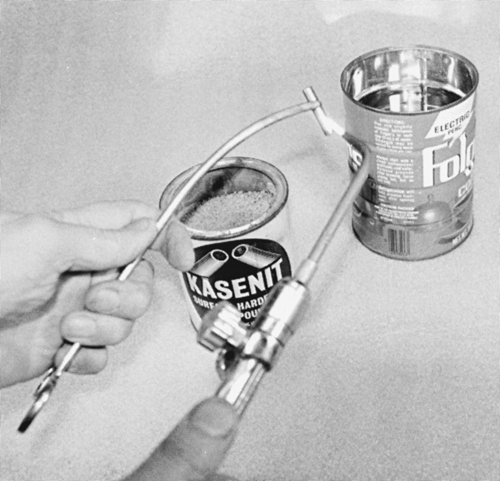
You will need to have some tools with which to harden parts, a work area big enough to use a torch and set the can of Kasenit, and a water bath large enough to accept your workpiece. It is nice to have an acetylene torch available, but you can get by with any source of heat sufficient to make the metal reach an even cherry-red color throughout. I have found most propane torches unequal to this task, if the workpiece is other than a small part. Since most of the parts which require case hardening are small anyway, the acetylene torch might qualify as a luxury, at that.
Your work area needs to be ventilated properly, be relatively fireproof, and in an area where dropping some hot particles on the floor will not incur the wrath of the housekeeper. To utilize the heat more efficiently, I also like to have a firebrick or asbestos block upon which to reflect the heat from the torch. Yes, I still use asbestos, but only in a compressed block, as I am afraid of the fibers and dust from it. Make up your own mind and accept the risk as one you have decided for yourself. When I think of it, I find and use a firebrick and feel that it works as well.
I begin by setting out the things I will need: the Kasenit, a container with enough water to be able to completely immerse the workpiece easily, some tongs or other suitable handling tool, and the heat source. When using acetylene and oxygen, I employ a tip which will produce a large flame without having to use a high velocity in the gas stream. A suitable rosebud tip—a heating tip with multiple flame orifices—is preferable to using a single flame with too much heat concentrated in a small area.
The tongs should be expendable, as the heating and quenching operations will most likely ruin the temper as well as the looks of the instrument. I use the ones that are my favorites for extracting the steel clips out of molten tire weights when casting. The Kasenit can should be opened and placed in a convenient place so that it will be ready when the metal is heated.
It should go without saying that any time you work with heated chemicals you should be wearing a face shield, but I repeat the warning. I do need to caution you that heating Kasenit will produce a flame which will greatly affect your vision, if not damage it. Kasenit doesn’t mention eye protection, but I know from experience that I couldn’t see well enough to finish the job the one time I tried to reheat Kasenit and metal without a gas-welding lens. I now combine eye and physical protection in a tinted face shield, since welding glasses don’t allow me to use the necessary portion of my trifocals.
Next, I prepare the metal so that I know I won’t be introducing an unwanted chemical into the process. This means that I clean the metal as if I were going to either plate it or blue it. It must be absolutely clean and free of rust. I usually do this by grinding, by buffing with a ScotchBrite wheel, or I chemically etch it and rinse it thoroughly. Equally effective would be sanding, sand or glass beading, or any other method which insures fresh metal being exposed throughout.
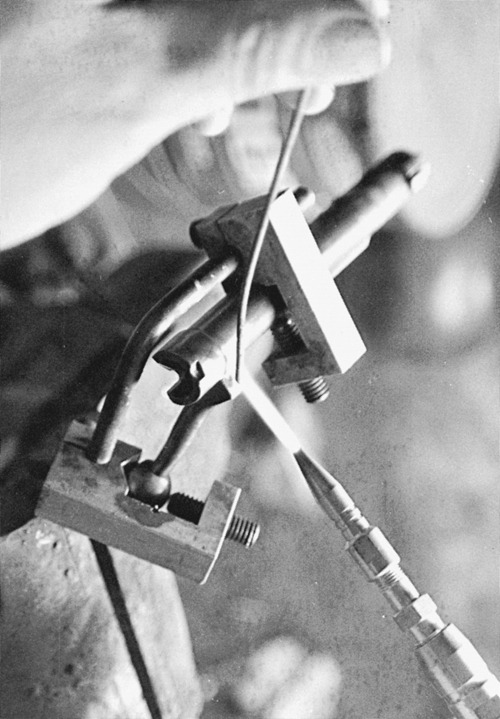
Heating the metal should be done as rapidly as possible without causing any one spot to become excessively hotter than the other regions of the part. I also use a slightly rich (high fuel) mixture to insure that no oxygen is introduced into the metal during the heating process. When the metal has reached an even cherry red throughout (approximately 1,650 degrees Fahrenheit), keep it at that temperature for several seconds, if possible, by moving the flame so that it covers a wider area.
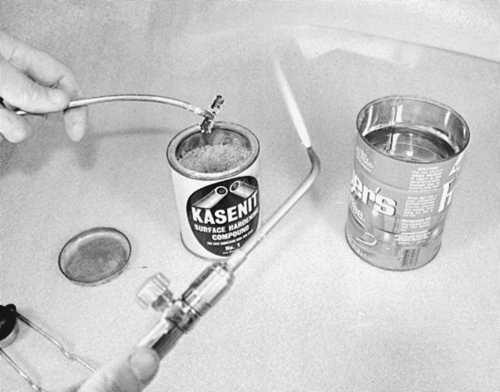
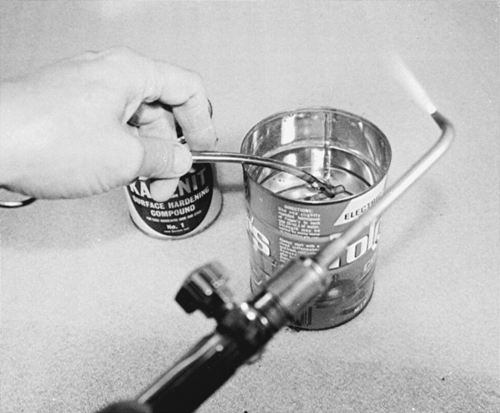
Dip the workpiece into the Kasenit can, working the part under the surface of the powder until it is entirely covered. Hold it there for about 10 or 20 seconds and pull it out. The Kasenit powder should stick on the part in a mighty clump. If it isn’t clumped over the part completely, I quickly dip it into the powder again and leave it for another count of 20. Reheat the entire mass until it glows a bright red again and immerse it in the cold, clear water bath without wasting any time. It is most important that the method of holding the part being hardened involves a tool which can be heated with the workpiece, as the tool cannot be allowed to draw heat from the area it contacts. This would result in a spot which wouldn’t be hardened as much as the surrounding area. The forceps I use has long fingers, placing the boxjoint far from the heating area. This heavier portion—the joint—would not last long under the heating I give the tips.
The quenching operation should include an action which insures that the workpiece is moving in the water in order to be surrounded by cool water at all times until the piece itself is cool. Holding it in one place would allow it to be masked from the cool water by bubbling and by natural convection of heat in the water. Keep it moving. Note: If you would feel better wearing gloves, do so, for the sizzling and popping will be quite violent when the hot mixture hits the water. In fact, it will sound unlike anything you have ever heard. You must have your face protected by the goggles and face shield I discussed earlier.
If I know I am working with a very soft alloy, I just repeat the dipping into Kasenit, reheating, and quenching. This might be necessary to reach the maximum hardness. However, you might not want to make the surface as hard as glass, so once more might meet your needs. I often use an old file from my junk drawer to check the hardness. If the metal has taken a sufficient hardness, it will not file, and will sound like you are dragging the file over the edge of a piece of glass—not steel. That sound tells me more of what I want to know about case-hardening than a Burnell test, as the softness of the subsurface usually causes a false reading by allowing the “skin” to flex, thereby reading softer than the actual surface really is. There is no mistaking the sound of an ineffective file once you have heard it. It is a very treble sound which metal, other than dead-hard, cannot coax from a file.
If you desire to harden tool steel, you use this same procedure except for the amount of heat. Tool steel should be heated until it reaches a light yellow (hotter than straw color) and then deposited into the compound. Leave it in the compound “until it reaches the tempering temperature,” and then quench. This quote is from Kasenit; I don’t know how you can see the temperature under the opaque compound. I have found that holding it under the compound for about five or six seconds and then quenching gives me satisfactory results. This will bring out the utmost hardness of tool steel without getting a part which will be brittle.
Another method is possible, but requires more Kasenit than I usually keep on hand. The instructions say to immerse the part in a shallow pan of the compound, heat it to 1,650 degrees Fahrenheit for 50 to 60 minutes, lift out of compound with dry tongs, and quench in clean water. One would obviously need quite an oven—a tempering oven to be exact—to perform this degree of hardening.
Case hardening always makes the surface of the metal less than glamorous, so part of the job is to restore the cosmetics to the degree required or desired. In most cases, steel wooling the surface is all that is required, but it may be necessary to buff to a shine occasionally. It is unlikely that you would buff through the hard layer, unless you get totally carried away. It is desirable to keep from doing this, as the first soft metal exposed tends to wash away much faster than the remaining hardened material around it, causing the condition to worsen. Since the part that needs to be sanded down is the hardest metal, it is most difficult to correct the surface unevenness without resorting to some drastic metal removal.
After cleaning the part to its original beauty (or homeliness as the case might be), the installation should not be any more difficult than it was before the hardening process. The case hardening should not have added any to the dimensions.
Click here to see American Gunsmith’s Website
Click here to subscribe to American Gunsmith


