The Dan Wesson revolver never really disappeared. Its production just passed from one owner to another and another. To the credit of these manufacturers, including the newest, there’s been no messing around with the design of the gun.
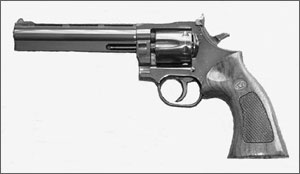
True, CZ-USA offers a choice between a fluted and a non-fluted cylinder, they reshaped the barrel shroud, and we understand their American-made Dan Wesson will be available in stainless only, but mechanically it’s the same as the Model 15-2 pictured here.
300
In the past, I’ve had owners of the Dan Wesson Model 15-2 mistakenly refer to it as a “Smith & Wesson.” Wrong! Daniel B. Wesson was the great grandson of D.B. Wesson, the “Wesson” in the original Smith & Wesson. While working at S&W back in the 1960s, Daniel B. thought it would be a great idea to bring out a revolver with interchangeable barrels. Whoever was running the operation at the time said “no way.” But young Dan B. didn’t take no for an answer. Instead, he opened up his own company in 1968, with far more in mind than just an interchangeable barrel. In addition to that, he wanted to produce a fresh design for a handgun whose basic format hadn’t changed in about 100 years. His would be a very simple, very strong design, providing out-of-the box match accuracy with the ability to maintain that accuracy over an extended period of time.
How did he do? In its class (the production class), Dan’s revolver won either 9 out of 10 or 10 out of 10 top places in metallic-silhouette championship competition for five years in a row.
The Dan Wesson frame is a Magnum frame regardless of caliber. Its mainspring is coiled instead of flat, the double-action pull is short, there’s a built-in trigger-stop screw, the cylinder latch is located ahead of the cylinder where it can’t interfere with the shooter’s grip, and the latch locks the cylinder/crane assembly to the front of the frame. At the rear, lockup is assured by a ball bearing under heavy spring tension that seats in the center of the extractor. These dual-locking features differ considerably from the long-followed practices of revolver-locking systems employed by other manufacturers. Nevertheless, a Dan Wesson has fewer parts than an S&W or Colt revolver.
Field Stripping
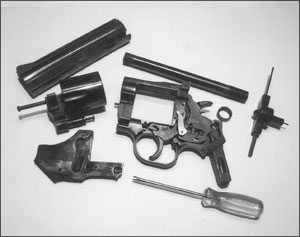
A disassembly tool (#1) is supplied with every new revolver. If you don’t have this tool, call CZ-USA (800/955-4486) and get one. Centered on the tool is a bore guide with twin lugs that fit the recesses in the barrel nut (#4). After engaging the lugs, turn the nut counter-clockwise and remove it. (If you happen to unscrew the barrel simultaneously, no problem. It sometimes comes off with the nut on a gun that’s less than well maintained.) Once the nut is off, the shroud (#7) is pulled free. If the barrel (#8) is still attached to the frame, unscrew it counter-clockwise. Using the largest of the Allen wrenches incorporated in the take-down tool, back out the retaining screw (#52) and remove the grip.
300
The next largest Allen wrench in the tool is used to undo the rear sideplate screw (#30) and front sideplate screw (#29). (Reassembly note: The rearmost is the longer of the two.) Position the gun with your palm under it. Tap the mainspring housing opposite the sideplate with a plastic mallet until the plate (#31) drops into your hand. Frequently, the hand (#38) will become dislodged in the tapping, and you’ll find it nestled in the plate. A small screwdriver is used to lift the crane lock (#42) from the frame. Remove the cylinder/crane assembly to the front.
If the above seems to be going a bit beyond mere field stripping, it is. But most of the Dan Wesson revolvers that have come my way have been pretty well fouled. (Take a look at the filth on the action in the accompanying photo.) I’ve always found it best to remove the sideplate in order to clean up the crud effectively. When you replace the plate, be careful; the edges are extremely sharp and the front edge is the first to reenter the frame.
Detailed Disassembly
Cut and affix three or four layers of duct tape to the interior surfaces of a pair of smooth-jaw pliers. Pick up the crane/cylinder assembly, and remove the bolt plunger (#36) and bolt spring (#34) from the crane (#26). Take hold of the ejector rod (#22) with your padded pliers, unscrew the rod counter-clockwise, and pull it out the front of the cylinder. Do likewise with the crane. The ejector-rod bushing (#27) and spring (#28) come out the front, and the extractor ratchet (#33) comes out the back of the cylinder.
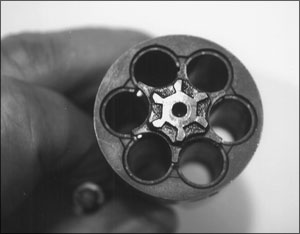
300
Look for a small roll pin (#23) in the crane. It retains the latch (#24) and latch spring (#25). Use nothing other than a roll-pin punch to drift the pin to the rear until the latch and spring can be removed upward. But don’t drift the pin all the way out. Leaving it partway in will make putting the crane/latch assembly back together much easier later on.
The cylinder hand has a slot in its back. The uppermost part of the hand rests on a permanent lug on the frame. The bottom of the hand fits over a post on the trigger (#39). To take out the hand, I use a small tool to move it just clear of the trigger post and frame lug, then use the tool again to lift the spring (#43) out of its slot in the hand. The same tool remains in play to lift the front leg of the trigger spring (#41) off the trigger so the spring can be taken out of the frame to the left. This will leave the connector (#44)—which is more frequently called the “transfer bar”—and its spring lying in their frame recess. Tweezers remove both. Depress the back end of the bolt (#37) to clear the frame and remove it to the left. Lift the long leg of the trigger spring off its shelf on the hammer and let it swing down as tension is relieved.
It’s time to take control of the mainspring (#11). Do so by pulling the hammer all the way back and picking up the longer sideplate screw. Insert that screw into the grip extension. There is a threaded hole in the lower end of the mainspring guide (#10). After you engage that hole with the screw and turn the screw in as far as it will go, you’ve mastered the mainspring. There’s no pressure on it now, so the hammer (#48) is easy to lift out to the left. Getting out the mainspring and guide should be easy, but it isn’t. You have to block the upper guide with a sturdy, straight-blade screwdriver or a length of flat stock and keep blocking it as you slowly back out the sideplate screw in the grip extension. Once the mainspring pressure is completely off, things get easy again. You can lift or dump out both the spring and guide.
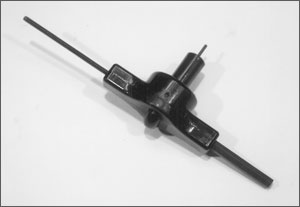
300
The hammer strut (#47), also known as the “double-action lever,” is removed from the front of the hammer either to the right or the left. Also taken out to the front are the strut plunger (#45) and spring (#46). After that, unhook the trigger spring from its large, milled-out area in the hammer body. Just under the firing pin at the rear of the frame is the aligning-ball screw (#21). Unscrew it and you’ll find the cylinder-alignment spring (#20) and ball (#19) mentioned in the earlier paragraph concerning how the revolver locks up. Before you can remove the firing pin, another roll pin (#12) stands in your way. It’s a roll pin, so you know what kind of drift punch you must use to move it.
Since handguns occasionally get dropped, their sights can suffer serious damage. Replacing them on a Dan Wesson isn’t difficult. The rear sight on the Model 15 is secured to the frame by its retaining pin (#16)—yet another roll pin—and the elevation screw (#14). Before you can back out the screw, the pin has to be drifted aside. But be somewhat careful; under the body of the rear sight are two tension springs (#13) that are easy to lose once the pin and screw no longer hold them captive. Up front, just under the front sight, you may see the end of a solid retaining pin (#6). Then again, you may not, depending on how good a polishing-off job’s been done at the manufacturer to blend in the end of the pin with the barrel-shroud rib. However, if you can eyeball both ends of the pin you can drift it out after you back out the front-sight retaining screw. The smallest Allen wrench on the takedown tool is intended for this purpose. With the pin and screw both removed, grasp the blade (#5) in your padded pliers and pretend you’re the most gentle dentist in the world.
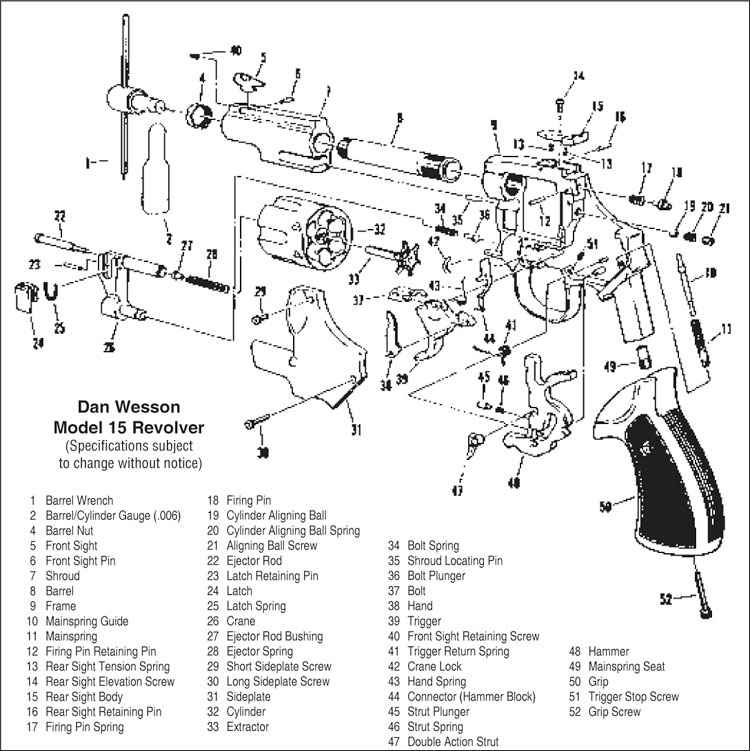
750
As I said before, the gun I used in this article is a Model 15-2. For some reason, the pin under the front sight was clearly visible on one side and totally invisible on the other—even under considerable magnification. It was not a through-the-rib pin. Why? I don’t know. There were two ways I could have gone about removal of the front sight blade if it had been badly damaged. With a drill slightly larger in diameter, I could have drilled out the pin, replaced it with one made from drill rod, blended it to a nice, flush fit with the rib, and applied some touch-up blue. Or I could have reached for my favorite factory adjustment fixture, a two-pound ball-peen hammer, applied the correct diameter steel punch to what I could see of the pin, and pounded it through. Undoubtedly, this desperate measure would have busted out the opposite side of the rib and bent the lower part of the sight blade in the process.
Actually, I know the owner of the Dan Wesson shown here better than any other person on the planet. And I also know he wouldn’t put up with such butchery. Besides, there’s absolutely nothing wrong with the front sight of this particular Model 15-2 and there never has been. I’ve owned it for years, and I deliberately dirtied it up so you could get a better look at how the inside of a great gun might look if it belonged to a less conscientious owner.


